RSS Feed

Wednesday, December 15, 2010

CHRISTMAS HAND MADE CARD

christmas-greetings
One of the first things that herald in the christmas season is greeting card. The shelves are stacked with boxes of varied, assorted and made to order cards, ready to be signed and mailed. Imagine for a moment how wonderful it would be to personalize your cards this year, and make your own card to send to those special friends and family on your list!
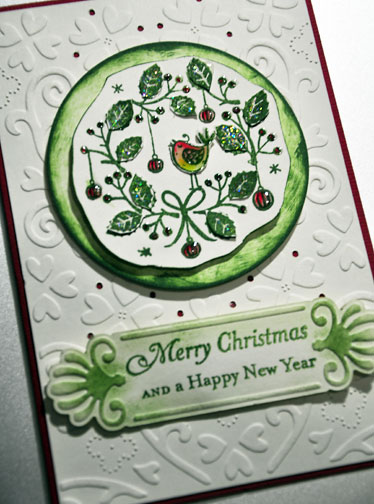
make your own card like this

handmade holiday cards .
card making supplies used for handmade card:
  • deep christmas red color cardstock 8" x 6"
  • cream color cardstock 3.7/8" x 5.7/8"
  • cream color cardstock scraps
  • clear stamps by Penny Black
  • background embossing folder
  • label die cut and emboss folder
  • color markers or other coloring media
  • pine green ink pad
  • paper trimmer
  • scissors
  • sponge
  • double-sided foam tape
  • glossy accents
  • glue


card making instructions

  • Score and fold red color cardstock to make a blank 4" x 6" folded card.
  • Dry embossed background on cream 3.7/8" x 5.7/8" cardstock.
  • Layer on top of folded red card with glue.
  • Stamp Penny Black's clear stamp with pine green ink on cream cardstock scrap.
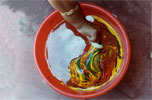
  • Color with color markers. You can also use water color or colored pencils.
  • Trim around image. Refer to photo above.
  • Cut a circle with another piece of cream cardstock and edged with pine green ink with a sponge.
  • Attach trimmed stamped image to green edged circle with double-sided foam tape.
  • Layer on top of dry embossed background cream card.
  • Die cut label on cream cardstock and dry embossed.
  • Stamp Christmas greetings with pine green ink on label.
  • Sponge pine green ink and dab lightly over embossed area and edges of label.
  • Layer on top of dry embossed background cream card just below the circle image. Refer to photo for placement.
  • Embellished with glossy accents on cherries and ornaments in stamped image.

Tuesday, December 14, 2010

ROSES MADE BY COFFEE FILTER PAPER


Tools and Materials:
Box of disposable cone coffee filters (8 filters will make one full bloom rose)
Scissors

16-gauge floral wire
Floral tape
Water color paint
Flat brush
Bamboo skewer
Glue stick


Coffee Filter Roses How to do it: 
1. Trace and cut petal shapes through both layers of filters, as per templates.
2. Form rose. With coffee filter No. 1, take four connected petals and poke an 18-inch length of 16-gauge floral wire down through the center of the bottom of one end petal so 1/2 inch of the wire remains sandwiched between two opposite petals.
3. Wrap adjacent two petals tightly around first two petals; wrap with floral tape around base, then 1/2 inch down wire, to secure.
4. When working with floral tape, pull it as you work to expose the sticky part of the tape.
5. With coffee filter No. 2, take four connected petals and sandwich "flower bud" between two opposite petals. On the adjacent petal pair, gently tear the perforation of the base so that you have a strip of 2 side-by-side petals. Wrap this petal strip around the other two petals and secure with tape.
6. With coffee filter No. 3, take four connected petals and gently tear the perforation at the base to create a strip of four petals. Wrap this petal strip around flower bud and secure with tape.

7. With coffee filter No. 4, gently tear the perforation at the base of petal shapes to create a strip of five petals. Wrap this petal strip around flower bud and secure with tape. (The folded petal gives rose stability and a more rounded form.)
8. With coffee filter No. 5, place three petals, overlapping slightly on rose and wrap just once (to avoid bulk) with floral tape to secure.
9. Wrap remaining three petals opposite the first three. Repeat for shapes cut from filters Nos. 6, 7, and 8. Use finger and thumb to separate petals, creating air pockets and making petals curve outward from the base. Use 3 or 4 extra single petals to fill in holes and give a rounded shape.
10. To paint the roses, use watercolor paints, mixed with a bit of water. Paint the base color, first doing the bottom, then the top, working from the inside out. Accentuate with a darker color on the tips. Use a flat brush to apply a third color of undiluted watercolor to edges. Let dry overnight.
11. Once painted roses are dry, curl left and right sides of outer petals around a bamboo skewer to create a point. Work your way from the outside to the inside of rose. Curl inner petals just slightly by wrapping top straight down around bamboo skewer.
12. Add five paper sepals secured with floral tape to short stem. Wrap floral tape in a spiral down wire stem several times to create a thick roselike stem. Burnish stem with skewer to smooth tape. Cut 6 paper leaves and sandwich a 4-inch wire between. Use a glue stick to stick 6 leaves together with a 4-inch wire stem.
13. Secure leaves to stem with floral tap.

Monday, December 13, 2010

GLASS PAINTING

 
Things you will need:  
1.     circle of double strenght glass of 7  inches.                                              

2. a white cloth or paper.  
3.glass paints of black,green ,red, yellow &   blue colours.
4.round tip paint brush.
5.a wire hook.

Technique:-
1. Take a 7" circle from double strength  glass. cutting a glass circle
 
2.Place it on a white paper or cloth.
3. Place the glass circle over the outline pattern. Trace the outline of the pattern with the outline black paint using the squeeze bottle and decorator tip. When dry, fill in the different elements of the pattern with color and the outline black will not bleed or smear. This will save a firing. 
applying outline paint to glass circle base
4. Start to paint the design. The paint should be the consistency of milk. Colors will tend to settle in the jar and will have to be stirred before and during use. These colors dry slowly to allow brush marks to level out. Puddle on the paint using a soft, round brush. One coat is all that is necessary. If the color is accidentally applied over the outline, immediately use the tip of your finger to push it back across the line.
applying color to the painted glass design
5. Using the light and dark green paint will add depth and realism to the leaves. On the flower petals, apply the main color, leaving the area to be shaded empty. While the first color is still wet, apply the second color and blend together with a fine brush. On the petals, the black is pulled back into the main color, leaving an irregular line, which gives a natural look to the flower.adding details to painted glass design

6. Place the painted piece in the kiln. Fire this project on a prepared kiln shelf to 1500°-1525°. When the glass if fired this hot, the surface will devitrify, which means that the glass surface will look frosty when finished. To eliminate devitrification, flash-vent the kiln lid after the firing process until the glass starts to lose its red appearance. Do not disturb and do not remove the glass until the kiln has reached room temperature.getting ready to fire painted glass piece in kiln

7. Lead, zinc, or brass came can be used for the edge of the finished piece. U-shaped brass filigree is used as the finished edge on this project. Wrap the brass around the outer edge and cut to length. fitting a brass filigree border

8. Flux and solder where the two edges meet. A small wire hook can be added to the back of the brass joint for hanging. Clean the project thoroughly with flux remover and warm soapy water. finishing the painted pansies suncatcher
Hang in a sunny place and give yourself a hand!

Friday, December 10, 2010

TISSUE PAPER CARNATION FLOWER


You will need:
  • Tissue paper
  • Scissors
  • 2 large paper clips
  • Pipe cleaners (chenille stems) or floral wire
  • Coloured marker pen
  • Optional: floral wire, floral tape, wire cutters
How to do it:

  1. You can make your carnations any size, but I found that a 3″ (7.5cm) circle gives a realistic-sized flower. Fold your tissue paper in half again and again until it is just larger than your circle size. I used a 20×24″ sheet of tissue paper, which let me cut 48 circles at once – enough for 4-5 carnations!
  2. Find a suitably-sized circular container and draw around it with a pencil onto your folded tissue paper. 
 
3. Start to cut out the circle, holding all the layers of tissue paper together. If you can’t cut through the whole thickness, try cutting half the layers at a time, then draw another circle to cut out the other half. I found that I could cut through 48 layers with no problem, as the tissue paper is so thin. You don’t have to cut too exactly, so don’t worry if some of the layers don’t come out as perfect circles. Use a large paper clip to help keep the layers together.

4. As you continue to cut, add a second paper clip on the opposite side of the circles to keep all the circles together.

5. This next step is the key to making the flowers look more realistic than standard tissue paper flowers.

6. Take a marker pen with a complementary colour (a cheap kids’ pen is fine). A bold colour will give a more effective result. Use your non-writing hand to hold the edges of all the tissue-paper layers together, and use the side of the pen nib to begin to gently colour the edge of the circles.

7. Take this slowly – if you press too hard, the tissue paper layers will separate. Colour a small section of the edge at a time, and go over each section a few times to ensure the colour is intense and the ink has saturated all the edges.

8. Continue to colour around the edge. When you are about halfway through, move the paper clips to areas you have already coloured, and fill in the gaps.9. You may well end up with a coloured finger by the time you have finished , as you have to hold the papers close to the edge to keep them together while you colour them! Don’t worry – it’ll wash off .

10. Remove the paper clips and select enough circles from the pile to make one flower. I used approx 12 circles per flower, but 8-10 circles would be fine.

11. Keep these circles together and poke two holes near the centre of the circles. I used the end of a pipe cleaner to do this, but if your pipe cleaners aren’t sharp enough you could use a large needle or similar.

12. Fold down about 1 inch of the pipe cleaner, and push the long end through one hole and the short end through the other hole.

13. Pull the ends all the way through, then twist the ends of the pipe cleaner together underneath the flower to keep all the circles together:

14. Now to make the petals. Separate the topmost circle and crumple it upwards from the centre. Scrunch up the paper randomly, but try to concentrate on the base of the petal (the centre of the circle) and leave the coloured edges alone.

15. Now repeat with each circle in turn. Crinkle each circle up individually, and try not to have the folds in the same place each time.

16. Keep scrunching… When all the circles have been crumpled up, you will end up with a lovely carnation like this:

17. Make a double-headed stem by cutting down one pipe cleaner to half its length (use wire cutters for this) then twisting it together with another completed stem: 

18. Cut the floral wire to the same length as your stem.

19. Holding the wire and pipe cleaner stem together, start to wrap the floral tape tightly around them. Start about 1″ down from the flower head (below, left) and wrap up the stem to the head. Then wrap all the way down the stem to the bottom. To wrap without the tape getting tangled up, hold the tape steady and at an angle to the stem with one hand (below, right), and use your other hand to twirl the stem around, winding the tape around itself as it goes.

20. The floral tape will stick to itself, so there is no need to use glue to fasten it down. Remember to stretch the end of the tape as you wrap the end of the stem, to help it to stick securely.

21. Make just one as a paper buttonhole. Make about a dozen, and you have a beautiful bouquet!

22. I hope you enjoyed this tutorial! If you make any tissue paper flowers.

Thursday, December 9, 2010

ITALIAN DOUGH RECIPE & ARRANGEMENT


You only need the things like:
  1. Cornflour         1/2 cup
  2. German glue or white glue      1/2 cup
  3. Water             2 tabs
  4. lemon juice1/2 tabs
  5. glycerine  1/2 tabs                                                                                                                                      
  6. non stick cooking pan
  7. Cooking oil       few drops
  8. Oil  paint colours (any colour you like.)
italian-dough-flower-requirments

doo flower making
Pink_italian_doo_flowers_italian_doo_Rose 

Method:

italian-dough-flower-making


  1. Take a non-stick pan and mix water and glue very well.
  2. Now add the cornflour into the pan and mix it faster don't leave the spoon until the dough soft.
  3. Add lemon juice and glycerine pure in the material and and now cook it on the very little heat.
  4. Make sure, dont leave the spoon until end because its necessary.
  5. pan, yIt take maximum 3 to 4 minutes. When the dough is become thick and leave to stuck the our dough is ready.
  6. Take out the dough into a plastic bag, but grease the plastic bag with Cooking oil, Vaseline or cold cream.
  7. Now to knead ( gundhana ) the dough in the plastic bag very well until the dough getting more smooth.
  8. Let it cold in fridge for 1 day.
  9. Mix the oil paint colour in the Italian dough very well by your hands.Now your dough is ready to make flowers.
  10. Take a little piece of dough and make a plan round bread of it.Make sure that your bread should be very thin and fine.
  11. Now twist and turn round the dough bread with your fingertips and gave it a shape of rose bud.
  12. For a rose, you make 1 bud,3 small petals and 5 big petals.
  13. Attached the small 3 dough petals one by one around the rose bud by glue.
  14. Now attached 5 big petals round the small petals.now you attached all the petals to the rose, but before you dry it, attached stem into the centre of rose flower with glue. Set and twist the petals like a rose. Now let it dry.
    doo flower making
  15. Covered the stem with wrapping floral tape around it.
  16. Now make leaves from dough with the help of cutter.The colour you add the dough should be green for leaves.you also make dark and light green leaves for a natural look. You can also use artificial leaves to decorate your flowers.
  17. Then you take the rose stem and attached the leaves on it with glue and floral tape.

Now your dough flower rose stem is ready.
Other Pictures are following (Arum lily)
doo flower makingbeautiful doo flower
TIPS:
1. You can also used the food colours in the dough instead of oil paint colours and mix the colour in the dough very well by your hands. But its always good to use oil paint colour.
2. Always keep the dough in plastic bag and then REFRIGERATE it.
3. Once you made the dough,protect the dough from Air, because air will dry your dough and waste it.
4. Always take small pieces of dough for use.
5. If you follow these instructions, your Dough will soft.

PATCH WORK TABLE RUNNER.


Required items:-

1).Printed fabric for corners,9 patch block of 5 inch square 
2).busy printed fabric for center,9 patch block of 5 inches
3).scissor
4).basic sewing supplies
5).pencil
6).matching threads.


Instruction:
This is such an easy runner to make. I'll do a tutorial here to show you just how easy lemon squeezy it is! I made this one with 27 charm squares, these ones are 5 inch squares. So lay them out into 3 groups to form a 9 patch block. Keep in mind that the squares in the corner of a 9 patch block will not be cut, so make sure that is a print you really like. The square in the middle of each 9 patch will be sliced twice, so keep that in mind too, busy prints or a neutral work best for the center square.So once you are happy with the placement, sew them into 9 patch blocks. Hopefully they will stay in order! I always seem to get one row mixed up along the way.And this is the fun part! After ironing your 9 patch block, slice it in half, rotate it and slice it again. So your block now becomes 4 blocks.After you have cut all 3 of the original 9 patch blocks together, you now need to arrange the 12 new blocks in a pleasing manner. For this one I regrouped 4 little blocks to make one big block again, so I had 3 large blocks to make the runner. I tried to have 2 little squares in the center of each block facing the same way for each of the 3 larger blocks. Does that make sense? But you could really arrange the blocks anyway you wished. That's the joy of a Disappearing 9 Patch block, it doesn't really matter!So once you have sewn all those blocks together you are on the home stretch! To make this runner just a little bit bigger and to frame it, I added a border of 1.5 inches as above.Quilt as desired. I just did a meandering stipple all over the D9P blocks and an echo stitch just inside the border. Binding is on and pinned in place ready to hand sew down for this one.

See? Easy! Let me know if you make one, love to see.

Wednesday, December 8, 2010

DECORATIVE ICE CREAM MADE BY FOAM


you will need:
- brown, dark pink, light pink, yellow and
  orange fun foam
- pink, white, yellow and brown
  dimensional paints and glitter
- glue for fun foam .

Instructions for the glittery cone:1. Print out the Ice Cream Cone Template and trace around each marking with a pencil. Turn the paper around and you should be able to see the markings through the paper. Now place the paper over the appropriately colored sheets of fun foam and retrace the markings you see onto the foam. Cut out the pieces.
2. To make the sparkly cones you will then use the dimensional paint to decorate the ice cream in the appropriate color. On the cone you can create a waffle look by first drawing stripes parallel in one way and then drawing stripes perpendicular to these.
3. Sprinkle same color sparkle over the dimensional paint outlines and tap off the excess glitter. Let the paint thoroughly dry.
4. Once dry, you can glue the top of the ice cream to the bottom cone piece.

WOODEN RABBITS


For this project you will need:

- 8 -10 mm thick plywood or other soft wood
  (for body and stand)
- 4 mm plywood for arms and carrots

- one 25 mm (1 inch) in diameter wooden half
  ball
- silver wire
- craft paints in the following colors: white,
  grey, pastel pink, orange, dark red, dark
  green, and black
- pink plaid fabric for scarf and ear ribbon

Instructions:

1. Print out each of the 3 patterns the same size and enlarge or decrease  with a copier if desired. Place the 3 rabbit body parts together to get the whole body.
2. Transfer the patterns on to the appropriate thickness of wood and saw out. Create a stand for the bunny in a size you prefer.
3. Paint the parts accordingly and let completely dry. A second coat may be necessary if the first coat does not completely cover.
4. Drybrush the edges of the pieces in the following colors:

White with grey
Green with white
Orange with red

5. Paint the nose pink and drybrush pink in the standing ear.
6. Drill holes in the body and shoulder where indicated and insert wire from the backside through the body and through the arm. The arms remain movable this way. Twist wire closed and spiral curl the ends.
7. Drill a 3.2 mm hole through the center of the face for the nose. On each side of this hole, drill three 1.5 mm holes vertically. These holes are for the whiskers.
8. Use a fine permanent marker or a thin paint brush and add the facial features. Blush the cheeks by drybrushing pink on them.
9. Insert 3 longer pieces of wire through the small holes in the face so that there are 3 rows of wire and the ends come out on each side of the nose. Spiral curl the ends.
10. * This part is tricky* Drill a hole in the nose but do not go through the nose. Screw a screw from the backside of the bunny face to screw the nose on. Use additional wood glue to hold the nose in place.
11. Rip a couple of strips of cotton plaid fabric and tie a bow around the neck of the bunny and also around the ear.  
12. Glue the carrots together, tie a raffia around them for dekoration and then glue them to the hands of the bunny.
13. Drill a hole through the center of the board and underneath the center of the bunny. Sink the hole in the board and add a screw from underneath to screw the bunny to the board. Additional wood glue will secure the bunny in place.


- drill with 1.5 and 3.2 mm bits
- one  35mm x 3.5 cm long screw (for
  screwing the bunny onto the board)
- one 35 mm x 2 cm long screw (or according
  to thickness of wood) for screwing the nose
  on
- paint brushes
- wood glue
- green natural raffia
- standard wood sawing and sanding supplies.

Tuesday, December 7, 2010

CANDY PLANT FOR KIDS


Materials Needed:-
Instructions:-
Paint the clay pot however you like. At this time you can also paint the craft sticks green. use however many sticks as you want flowers. Let the paint dry!
 
Place a snug piece of green floral foam in the pot. You can also place tissue paper in the pot first so it sticks out of the top of the pot. If you don't have floral foam, you can fill the pot with rocks or even candy!
 
Glue the wrapped candies one end of a craft stick. If you want 'fuller' flowers, consider cutting flower shapes out of craft foam, felt, or construction paper and gluing them to the craft stick first.

Poke the craft stick stems into the floral foam in the pot. Once all of your flowers are in place, you can fill in around them, covering the floral foam, with shredded tissue or Easter grass.

MAKE YOUR OWN RUBBER STAMP

Image for Make Your Own Rubber Stamp DIY Craft Project

1.)  Plain copy paper
2.) A pencil (I used an art pencil from Faber Castell – 2B)
3.) An eraser for fixing mistakes in your drawing
4.) A thick piece of rubber or other material meant for carving stamps – I used Speedball’s Speedy-Cut…they make a pink one and a white one . The white one seems to be softer than the pink one but both cut “like butter” as it says on the packaging for many such products. )
5.) A carving tool (Mine was a set that came with 5 differently sized cutting heads – Speedball’s Lino Cut Assortment)
6.) Ink specifically for your application (fabric, paper, cardstock, etc.) – just make sure it is a thicker ink if you plan to apply it with a roller. 
7.) A piece of wood just larger than your final stamp to use as a backing


How to do it:-


1). First make a line drawing. If this is your first ever stamp-making project you might
want to keep details to a minimum and stick with thick, wide lines. This will make it easier when it’s time to carve. You can either color in the areas you plan to carve with your drawing (this will be the space that doesn’t get inked) or the areas that will print so it will look more like your final piece as your carving it – just decide ahead of time and stick with it.

2).  The Speedball material will actually pick up the outline of your drawing…no tedious tracing needed! Put your drawing face down on the material and rub the back of the paper with something hard and smooth.  Also take care not to move the drawing once you have started transferring the image.


3). Once your image is sufficiently transferred onto your rubber material, you can begin carving out the details of your drawing. I start by outlining the areas with a small tool then cutting in with the larger tools.


Carve out the parts of your image you do not want to print


4). Once you have cut out all the fine details you will need to remove the excess material from the sides so your image comes out cleanly. If you are used to creating shading and dimension in your artwork you can get a similar effect from making shallow, light, strategically placed cuts in your stamp.

5).Glue your finished stamp to the wood backing…if you don’t put a backing on it, it’s wigglyness may cause an uneven impression on your finished piece. Sometimes I get excited and skip this step, but it is the proper way to do it.


Get ready to do a test print!
Ink your rolling surface and get a good, even coating of ink on your roller. Roll the ink on to your stamp and test it on a non-essential piece of paper. You will likely see areas you need to fix in your stamp. Just cut these areas away, and test one more time before you’re ready to create you’re finished stamped piece.

Monday, December 6, 2010

MAGAZINE HOLDER HOUSE

Materials :-          
1 .Ruler                                                                                                                                          
2 .Coloured markers
3 .Cardboard magazine and file storage boxes
 
4 .Craft or utility knife
5. Corrugated cardboard
6. Craft glue
7. Acrylic paints
8. Paintbrushes (foam brushes are handy for painting large areas)
9. Poster board or construction paper for grass and stepping-
stones                                                                                                                                                    
10. Dental floss or twine and a wide-eyed sewing needle for assembling a fence
Instruction:-
  1. step1 To construct each building, use a ruler and marker to draw rooflines, window openings, and doors on an unassembled magazine box. For variety, you can set the peak of the roof off center 2 or 3 inches as we did for some of the buildings pictured above. Cut the cardboard (a parent's job) along the lines and remove the side flap. Then assemble the box. For a long, narrow building, assemble and mark a file storage box, as shown, and cut along the lines.
  2. step2 For the roof, cut out a piece of corrugated cardboard. To figure out the dimensions, first measure the length of the upper edge of the front wall and add a couple of inches for an overhang. Then measure the width of the side wall, again adding an inch or so. Fold the cardboard to create the roof peak and glue it in place atop the building. If needed, loosely apply strips of masking tape to hold the roof in place until the glue dries.
  3. step3 Now you can paint the roofs, window trim, shutters, and doors and add any other details you desire. For example, you can glue on a cardboard steeple to create a church or fill a barn with packing-paper straw. For the finishing touches, cut out a village green from poster board or construction paper to arrange the buildings around and add paper stepping-stone paths. For a fence, cut out a bunch of small corrugated cardboard pickets and string them together with dental floss or twine.

POTTERY PAINTING


painting plant potsYOU WILL NEED: A clay pot, suitable paints in various colours (we usually just use poster paints), small paintbrush, a container with clean water, and lots of newspaper to save your table from being painted!
  INSTRUCTIONS:-
 1.  Wash the clay pot in warm soapy water to remove any traces of dirt or grease.
   
2.Cover the table or painting area with newspaper, find paints, paint brushes and a mug of clean water (to clean the paint brushes when swapping colours).
   
3.When the pot has dried, start painting whatever design you like!


4.Ensure each layer of paint dries thoroughly before adding another colour on top.


5.Allow the painted flower pots to dry out.
And hey presto! you have delightful one-of-a-kind painted clay pot!

Tips:-

Since clay pots are porous, they do dry out very quickly by themselves, but to hasten the process, pop them on top of a radiator, on a sunny window ledge or in the cool oven of an Aga or Rayburn.

Sunday, December 5, 2010

RAINBOW POT PAINTING

                                                                                                        
Materials Required :
  • Enamel Paints (Different Colours)
  • Brush
  • Water
  • Container
  • Earthen Pot
Procedure : 
  1. At first, colour your earthen pot with any enamel paint.
  2. Now take a container containing three-fourth quantity of water and spill different colors of enamel paints into it.
  3. The different colour paints float on the water.
  4. Now gently hold your painted pot at its edge and dip it into the water and twist it around, in the water and slowly take it out of the container.
  5. Keep the pot aside without disturbing it.
  6. The wet paints will slowly take its own design and shade.


  7. Wait till the pot dries.
Your pot painting is ready